Professional Tips for Taking Photos
Worth a Thousand Words
© 2026 Peter Pelland / Pelland Advertising
March 2008 - Updated March 2012
I have spent sunny weekends over much of the last 30 years taking photographs on-location at countless campgrounds throughout the Northeast and beyond. Now that I have officially “retired” from that aspect of my business, I am willing to share the secrets of the trade so that you can take the best possible photos on your own.
What
Makes a Photograph Effective?
There is
an intuitive difference between “good” photos and “bad” photos. To be
effective, a photograph should be taken from the buyer’s perspective, not
the owner’s perspective. Just as importantly, it should be taken from a
fresh perspective.
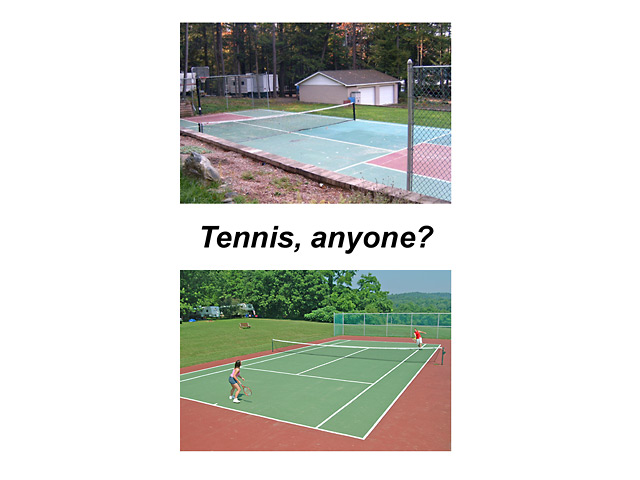
It is
important to “style” the shot. This may mean trimming weeds, taking down
clotheslines at campsites or towels on fences, replacing burned out light
bulbs, planting flowers, raking a beach, and replacing dead shrubs. Keep in
mind that my impressions are the same as the impressions of first-time
visitors. The list goes on: replace torn (or missing) basketball nets,
repair sagging tennis nets, open table umbrellas around your swimming pool
(or repair or remove them, if they are broken).
Composition and “Selling the Sizzle”
Think of
the difference between an old-fashioned “training” film or Cold War
propaganda film and a new Hollywood blockbuster with an all-star cast. One
is filled with nothing but facts (or lies) and bores you to death, while we
actually pay to see the second. This is what the advertising industry has
long referred to as “selling the sizzle instead of the steak”.
You may
remember the popular television series “The Wonder Years” which originally
aired from 1968 through 1973 but lives in syndication. Ben Stein played a
recurring role as Mr. Cantwell, Kevin Arnold’s monotonous junior high school
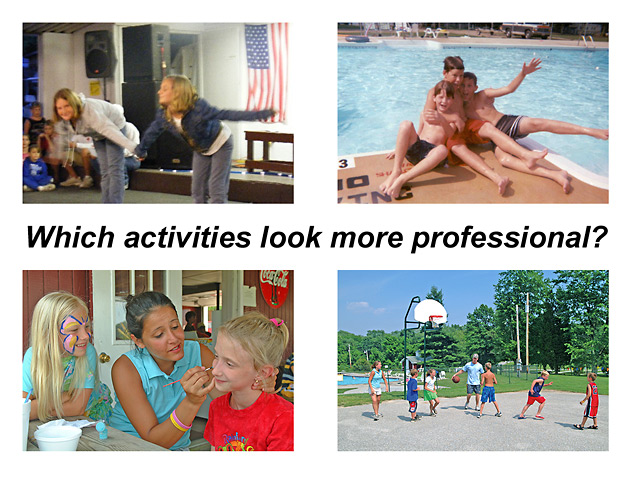
science teacher. We do not want your photos to be something out of one of
his educational filmstrips. “This is our swimming pool. This is our office.
This is our playground.” Unfortunately, this is precisely what I see time
and time again when I review campground photos, particularly those which are
posted on campground websites. Unlike the social media that are beyond your
control, you determine what appears on your website, on your brochure, and in your
other advertising. Why would you choose to show images which can only serve
to make your business look bad?
Rarely
would you want to show a photo of an empty campsite. Instead, using a
pull-thru site as an example, you would want to show the site occupied by a
new Class A motorhome, showing the site’s ability to accommodate multiple
slide-outs, and – most importantly – showing the owners of that motorhome
enjoying their use of the site.
Rule # 1: A good photo will not show facilities; it will show the kind of people whom you are trying to attract (who are the same nice folks who you would like to have camped out at the site next to yours), enjoying that facility.
Of equal
importance is the composition of your photographs. Most people know that,
with the exception of “mood” shots such as sunsets, where the sunlight
itself is the subject of the composition, you generally want the sun to be
coming over one of your shoulders when taking an outdoor photo (or even an
indoor photo, if it includes one or more windows). The idea is to avoid
harsh shadows, while using light to enhance both definition and a sense of
dimension. For the same reason, you should avoid taking photos at or near
“high noon” in the summer, when the sun is too high in the sky and creates
the harshest of shadows.
If you
have noticed my references to sunlight, you probably know that I would
discourage you from taking photos (unless they absolutely cannot be taken at
any other time) on a cloudy day. Avoid cloudy days, of course rainy days,
and even hazy days. Lots of people think of them as sunny days; however,
when the “3 H’s” (hot, hazy and humid) are in the forecast, put your camera
away. You want your photos taken on days with clear blue skies and crisp
shadows, preferably with just a few fair-weather cumulus clouds added for
impact. Everybody wants to vacation when the weather is perfect, so you
should show your business under precisely those conditions.
When I
was taking photos on location, for budgetary reasons we needed to get
everything completed within one (perfect weather) day. Upon arrival, my
first task was to do a quick run through the park with a map and a golf cart
(and, hopefully, with the owner as my tour guide), taking notes to reference
throughout the day. It is easy to determine the shots that need to be taken
immediately, and those that will need to be taken later in the morning, in
the early afternoon, in the later afternoon, or perhaps in the evening. In a
studio environment, lighting is fully controlled by the photographer;
on-location photography is dictated by the movement of the sun and clouds.
Rule # 2: Take your photos, whenever possible, on the types of days when you would want to be outdoors camping yourself.
Although
it is one of its key elements, there is more to composition than only
lighting. The next important factor is angle of view. Most photos should be
taken at eye level and at an angle which views the subject slightly from the
side, rather than head on, in order to create a greater sense of dimension.
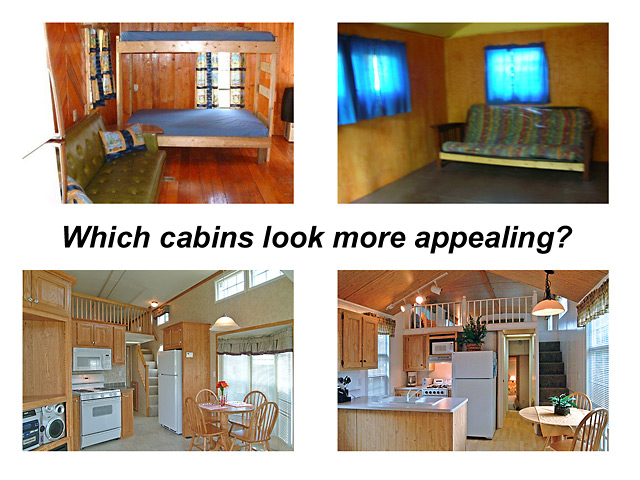
All subjects (not just models) have their “good sides”. An office building,
rental cabin or any other similar free-standing structure should generally
be photographed from the side with the main entrance. As the photographer,
you should be positioned from 20-45 degrees to either side of dead center.
Once again, the idea is to show some dimension. Whether you are positioned
to the right or left of center will be determined by factors such as the
direction of the light, the better of two side walls or surrounding spaces,
landscaping, or foreground material that cannot be easily moved or moved
within. The same rules hold true when photographing an RV. The best angle
will usually include both the front (rather than the rear) of the unit and
the side with the entrance (rather than the side with the utility hookups).
Particularly
if you are photographing any type of architecture (either outside or
inside), it is also extremely important to position the camera so that it is
level and at an angle which is parallel or perpendicular to all
architectural lines. Never point the camera up or down in order to show more
of the scene. If you feel that this is necessary, you either need to move
back (if there is room to do so) or zoom out (or use a wider angle fixed
lens). Always try to compose the image directly in your camera’s viewfinder,
changing your position as needed in order to improve the composition.
Effective commercial photographs are never “snapshots”.
Rule # 3: A snapshot is to photography what a hot dog is to fine dining. Take photographs.
Psychology and Hidden Messages
There is
much more to photographic composition than can be covered in this venue;
however, the basics of composition go hand in hand with the subtleties of
psychology. When you are trying to use photos to enhance your marketing and
in an effort to generate new business, it is important to try to resonate
with the needs and desires of your target market. If you are running a
family campground, you are not selling campsites and facilities as much as
you are selling vacations, leisure time, the creation of family memories,
and opportunities for new social experiences. By depicting your actual
campsites and facilities, your goal is to reassure prospective customers
that you have the ability to deliver on their expectations.
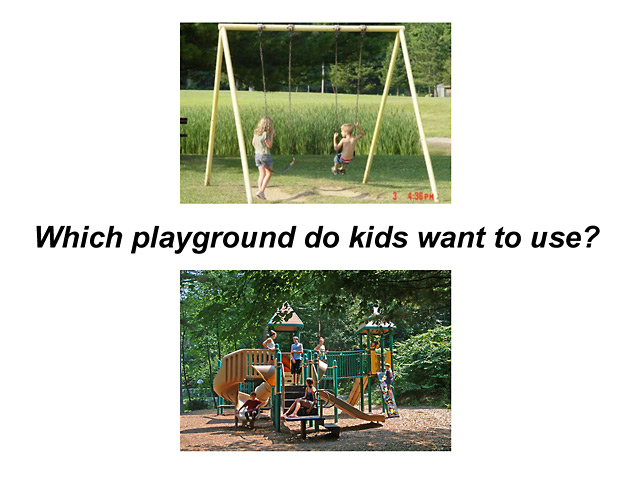
Once
you recognize that your business is the creation of opportunities for
positive social experiences, you will begin to realize why your photographs
should almost always have people as the primary subjects, with your
facilities serving as very important “props”. Nobody wants to be the only
person at a dance, and no child wants to be the only one on a playground.
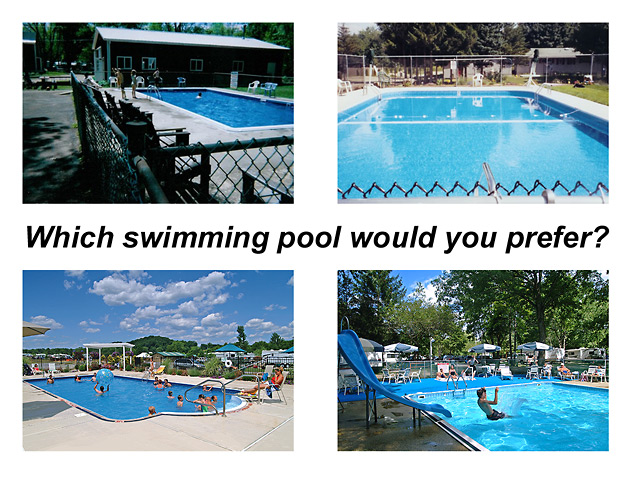
When I see photographs of empty swimming pools, I know
that there is nothing fun happening here, and I cannot help but wonder
whether the water is too cold, the hours are too limited, or whether the
pool failed to pass its chlorination test.
Rule # 4: A successful photograph is carefully staged but looks totally candid and spontaneous.
Because
water is such a crucial element in so many vacation experiences, let me
share a few more tips on how to photograph swimming pools. Many of these
tips will apply to other types of photos as well.
-
Take your photos from inside the fence. Unless your pool is surrounded by an extraordinarily beautiful fence, perhaps enhanced by professional landscaping, a fence in the foreground of the photograph presents a visual and psychological barrier between the viewer and your pool.
-
Prep the scene. Pick up any clutter, and get the towels off the fence. Move people, chairs, trash receptacles, and tables around, in order to improve the composition. (You will be amazed at how cooperative people will be in 99.99% of all instances when they are politely asked to help.
-
Not too empty, but not too crowded. Try to take your photos when your pool area is filled to about half of its normal capacity, psychologically telling the viewer that there is room for another family to join in the fun.
-
Watch the adult: child ratio. Children may be influential, but adults will ultimately make the decision to book a reservation at your resort. Be sure that there are more than enough adults in the photo to assure viewers that the children in your pool are adequately supervised and well behaved.
-
Prep the people in the scene. Inasmuch as possible, you want to be photographing people who will reflect positively upon your business. Your “models” should look like people who would live down the street, not down the cell block. Choose to highlight people who will enhance, rather than detract from, the photo and the scene. People should be wearing appropriate swim wear, not street clothes, and we do not want to see any kids wrapped up in towels, shivering and suggesting that the water is cold. Try to get swimmers dispersed throughout the pool, not huddled in front of the camera – and never looking directly into the camera.
-
Avoid anything which depicts horseplay or potentially risky behavior. This would include running, people being thrown into the water, people swimming underwater (who might look like they are drowning in a still photo), or the consumption of alcoholic beverages – to name just a few.
-
Last, but not least, avoid sexist clichés such as young women posing at the side of the pool in a manner that would never be mimicked in real life. If nothing else, this is just plain dumb and right out of the 1960’s, sending the hidden message that the owner of the campground is a Neanderthal.
What Not to Photograph
We have
already touched upon several things to avoid when we discussed the
psychology of photography. These included everything from fences to scenes
without human elements to cloudy weather. The overall goal is to depict your
business in the most favorable manner possible (through lighting and
composition) while still maintaining a realistic and accurate presentation.
It should be obvious that you want to avoid photographing weeds, a wall that
needs to be painted, a patch of bare lawn, potholes in a roadway, or an old
broken-down RV; however, you must be careful not to misrepresent your
business while showing it in a positive light. In fact, let’s make that Rule
# 5.
Rule # 5: Show your business in a positive light, but never misrepresent reality.
With
that rule in mind, the following is a list of what not to photograph:
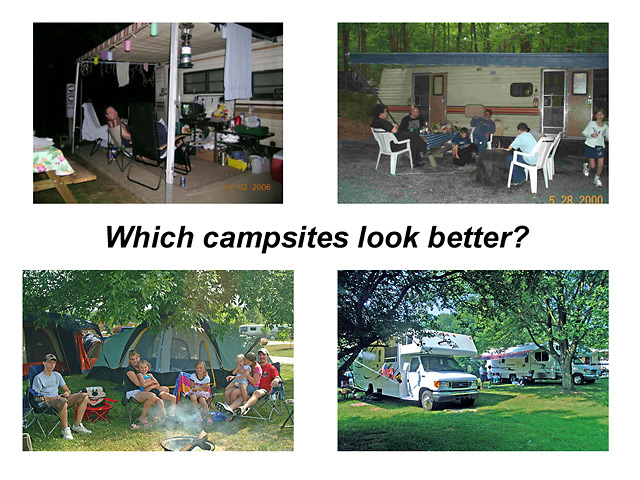
-
Motor vehicles and RVs which are not either new or late models.
-
Cluttered campsites. Either choose another site to photograph, or clean up the clutter. This includes clotheslines, trash bags, and empty chairs.
-
Anything which is in violation (or which may be stretching) any of your rules and policies.
-
Children on bicycles who are not wearing helmets, people in boats who are not wearing life vests, dogs that are not on a leash, or anything else which might represent an insurance liability.
-
A cash register or money changing hands. People desire a great vacation experience, but you do not need to remind them that everything in life has a price.
-
The consumption of alcoholic beverages or the smoking of tobacco products.
-
People whose grooming or wardrobes may be beyond conventional standards and comfort levels.
-
Anybody, but particularly children, who may be even remotely depicted in any manner which might be interpreted as sexually exploitive. It is impossible to be aware of everything when photographing people in a group setting; however, it is important to carefully inspect each and every photo before it is actually used, either in print or online. If there is any possibility that an image may be inappropriate, destroy the image.
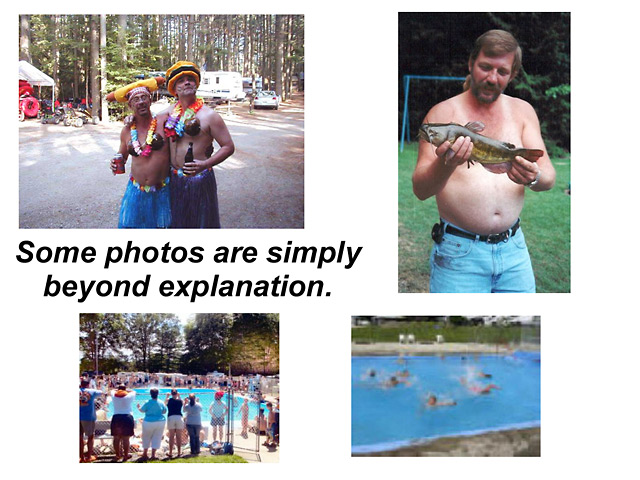
-
Any photo which requires an explanation.
Rule # 6: Good photos never need captions.
Equipment Requirements
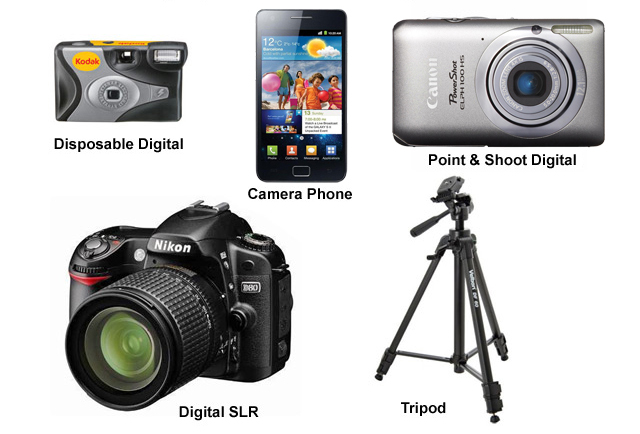
Years ago,
people would ask what kind of film to use. Today, the question is, “What kind of digital camera do I need?” What you
should be looking for in a camera are the following:
-
At least 6 megapixels of resolution.
-
A lens with optical (as opposed to digital) zoom capability which includes wide angle settings.
-
Adequate storage capacity (memory) – the digital equivalent of not running out of film.
-
A user-friendly interface for transferring images from the camera to your computer.
-
The ability to provide several hours of continuous use on a single set of batteries.
If
your budget permits, choose a single lens reflex camera (a camera with a
viewfinder which shows you exactly what the lens sees) with the
capability of using interchangeable
lenses. However, you should try to find one zoom lens which will cover
everything from extreme wide angle through moderate telephoto focal lengths.
You should try to avoid changing lenses in a dusty or windy environment.
Cleaning dust from your sensor is a tedious process which is best left to a
professional. If you do not purchase a camera with either a built-in lens or
which comes with a full-range zoom lens, it is not unusual for the lens to
cost as much as the camera itself.
There is one other essential piece of camera equipment to round out your investment.
That is a sturdy tripod which should be used whenever possible. On the other
hand, image stabilization (also known as shake reduction) technology in the
new breed of cameras is quite good at overcoming slight camera movement.
Formats,
Resolution & Reproduction Requirements
If there is any chance that your photos will be used in print, shoot at or near your camera’s highest possible resolution setting. These settings will be measured in pixels. A typical computer monitor might have a resolution of 1024x768 pixels, with 72 pixels per linear inch. As you might imagine, a digital photo taken at that resolution would be full-screen in size and enormous by web standards. That same resolution, however, might be totally inadequate if you plan to use the photo in a printed brochure or advertisement. With four-color printing requiring photo resolutions of 300 (or 400) pixels per inch, that same 1024x768 image could only be used to reproduce – at best – about 3x2'', pretty much the print equivalent of a “thumbnail” image.
Higher
resolution photos will result in larger file sizes. As you might imagine,
your goal will not be to see how many images you can fit onto a memory card!
In addition to allowing you to reproduce an image in a larger physical size,
a larger file size will also give you a far greater ability to crop or make
any of a wide variety of digital photo enhancements.
Rule # 7: You can always make a digital photo smaller, but you cannot make a photo larger without seriously affecting the image quality.
Even
the best image editing program (Adobe Photoshop)
cannot enlarge an image when the digital information simply does not exist.
You will only end up with a larger file size and blurry photo after the
software has interpolated (“guessed at”) the missing pixels that you are
asking it to add.
If your
photos will be used for larger than typical print reproduction – for
example, a full-bleed 8½ x 11'' directory cover – you will also want to
choose a higher quality image file format than the JPEG setting which will
likely be your camera’s default. The problem with JPEG is that it is a file
compression algorithm which results in loss of resolution when the file is
uncompressed upon opening. Look for a TIFF or RAW file format option on a
better quality digital camera.
One last
note: Be sure to disable any date and time stamping mechanism on your
camera. The file will automatically show the date and time that an original
image was created, and there is rarely a valid reason to destroy the corner
of your photo with this unnecessary information.
Keeping Digital Enhancements from Going Too Far
There
isn’t anything which cannot be accomplished these days by a personal
computer and a skilled user of an image enhancement software program such as
Adobe Photoshop. Although
tabloid journalists consider Photoshop
to be a direct gift from God, allowing them to create that “two-headed boy
from Mars” in a matter of minutes, most reputable news media for very sound
reasons have forbidden most such image manipulation which might even subtly
distort reality. I strongly believe that advertising photography should
adhere to the same strict standards. It is perfectly fine to adjust
contrast, color balance, sharpness or the size of an image. I will also
admit to having removed more than my share of pot bellies, tattoos, and bald
spots. What I will not do – and what you should not do – is “repair” a
facility unless there is a 100% assurance that the physical repair will have
been made before the photograph is used. To do otherwise is to engage in
deceptive advertising. Photoshop is not a substitute for what should be
routine repairs, maintenance, or landscaping.
When to Turn to Stock Photography
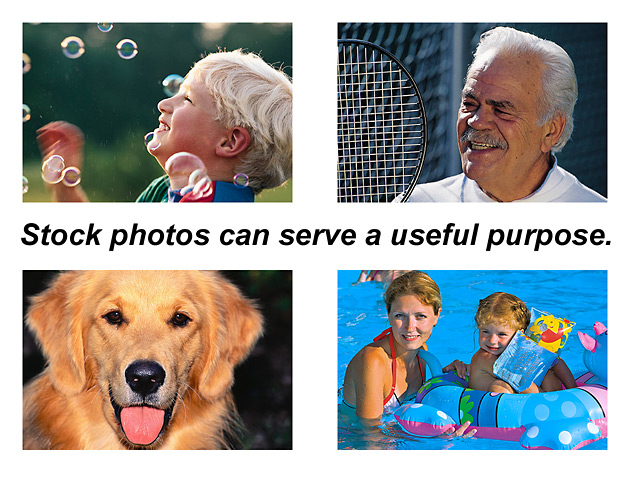
The
Internet has made stock photography readily available, easy to locate, and
very inexpensive. Keeping in mind that you should never use a photo with the
intention of deceiving the viewer, there are times when the use of a stock
photo may be appropriate. One example might be a facility that is under
construction but which will be completed once your season begins, as long as
the stock photo is an accurate, non-embellished representation of how your
new facility will appear. Another example would be the use of a generic
photo showing people engaged in an activity which is offered at your park.
Stock photography can be a very useful tool, as long as the images are
never used to misrepresent or exaggerate what you offer. The misuse of
stock photos will backfire and pose the risk of causing tremendous harm to
your reputation.
One
last point about stock photography is to remember that you must obtain
permission for its use. This permission will almost always require payment
of some sort of fee. Just because a photograph appears on the Internet and
is not accompanied by copyright notice does not imply in the least that it
is free to be used. The act of publishing effectively copyrights a photo,
and few competent photographers (and certainly no professional
photographers) will ever sell an image outright or allow its use without
both permission and limitations. When you purchase a stock photo, you are
actually purchasing limited rights to the use of the photo. When dealing
with a stock photo agency, I would recommend that you always try to find
royalty-free, rather than
rights managed, images. With
royalty-free images, you are purchasing the right to use a photo multiple
times and in a variety of formats without having to pay additional fees.
With rights managed images, you must pay a fee for each use of the photo,
making it a generally unaffordable option.
Releases, Rights Management & Legal Issues
We
are living in a society that is obsessed with litigation. We are also living
in a society where our rights to personal privacy are under constant attack.
When it comes to advertising photography, my recommendation is that you do
your best to protect both your interests and the rights of your guests.
Never, under any circumstances, take a photograph of anybody without their
advance knowledge or, in the instance of a once in a lifetime candid photo
opportunity, by getting their express permission immediately afterward.
Always remember that you are taking photographs,
not snapshots.
Nobody
plans a vacation at a campground (or anywhere else) with either the
intention or expectation of becoming a model. On the other hand, over 99% of
your guests will be thrilled to be a part of a photo shoot and will go out
of their way to be cooperative. Nonetheless, it is important that you at
least get people’s implied, if not their signed, consent. I am pleased to
provide you with a model waiver
template which you are free to use; however, it is important to presume
that no waiver or release will ever hold up in court. The rights of
the individual will always prevail. The primary purpose of a release is to
weed out potential problems from that one person in a thousand who would
like to get rich quick and own your business, with the help of his attorney
brother-in-law.
If a
release is so powerless, when and why should it be used? In a public
setting, where nobody is being held up to ridicule, I have always followed
two rules:
-
If there are fewer than 7 people in a photo, get them each to sign a release.
-
If there are more than 7 people in a photo, but anybody is prominently featured in the center or foreground, get signed releases.
A third
rule might be to always get signed releases for any children whom you
photograph, remembering that only a parent of a minor has the legal
authority to act in this manner.
If
you take a photograph and a person balks about signing the release, refuses
to sign the release, jokes about compensation or a lawsuit, or the subject
is a minor who is not accompanied by a parent, make a note to not only not
use the photo but to destroy the photo in order to prevent it from
ever being used unintentionally or without your knowledge (but, as the
photographer, with your ultimate responsibility). Should you hire a
photographer to take photos on your behalf, you will share any liability
which results from that photographer’s failure to exercise due diligence in
obtaining a release.
Some
resorts incorporate a blanket release into their registration agreement;
however, these are much less likely to hold water in court than a signed
release (which is already as water-tight as a colander) and are perhaps
little better than no release at all.
Again, if
you are hiring a photographer, you should be aware of precisely what it is
that you are purchasing. As with stock photography, you need to know what
rights are being conveyed. Just as certainly as stock photography will
always require payment of a fee, no reputable photographer will ever perform
what is legally defined as “work for hire”. You will not be purchasing the
actual photographs (which is essentially virtual property anyway now that
almost all photography is digital) but the rights to use those photographs.
If there are any restrictions on their use, aside from actual ownership
itself, be sure to get those limitations defined in advance.
In summary, photography is a key element in the insurance of not only your business’ marketing efforts but in the overall success of your business itself. Prepared with the right tools and knowledge, you can do it yourself or certainly be better prepared to supervise somebody else working behind the camera on your behalf.
![]()
![]() Peter
Pelland
Peter
Pelland
This text was originally prepared for presentation at
the
44th Annual Northeast Conference On Camping
(Springfield, Massachusetts - March 15, 2008)
Edited for presentation at the
Mid-Atlantic Coastal States Campground Conference
Dover, Delaware - March 7, 2012
Pelland Advertising
25 Depot Road,
Haydenville, MA 01039 U.S.A.
(413) 268-0100 / Fax: (413) 268-0173
Internet: www.pelland.com
Empowering small businesses with cross-media publishing.
© 2014, Peter Pelland / Pelland Advertising
Portions may be reprinted without written authorization
providing that a credit line with copyright notice is attached.
![]()
![]()
![]()
![]()
![]()
![]()